Run R inside of your Flows
Run R code directly inside of your Flows and generate outputs.
R is essential for statistical analysis, visualization, and data manipulation. With Kestra, you can effortlessly automate data ingestion, conduct complex statistical analysis, and handle real-time data processing. Kestra’s robust orchestration capabilities ensure that your R scripts run smoothly and efficiently, streamlining your data-driven projects.
This guide is going to walk you through how to get R running inside of a workflow, how to manage input and output files, and how you can pass outputs and metrics back to Kestra to use in later tasks.
Executing R inside Kestra
Kestra has an official plugin for R allowing you to execute R code inside of a flow by either writing your R code inline or by executing an .R file. You can get outputs and metrics from your R code too.
Scripts
If you want to write a short amount of R code to perform a task, you can use the io.kestra.plugin.scripts.r.Script type to write it directly inside of your flow. This allows you to keep everything in one place.
id: r_scriptnamespace: company.teamdescription: This flow runs the R script.
tasks:  - id: http_download    type: io.kestra.plugin.core.http.Download    uri: https://huggingface.co/datasets/kestra/datasets/raw/main/csv/orders.csv
  - id: r_script_task    type: io.kestra.plugin.scripts.r.Script    script: |      print("The current execution is {{ execution.id }}")
      # Read the file downloaded in `http_download` task      data <- read.csv("{{ outputs.http_download.uri }}", header=TRUE)      print(data)
You can read more about the Scripts type in the Plugin documentation
Commands
If you would prefer to put your R code in an .R file (e.g. your code is much longer or spread across multiple files), you can run the previous example using the io.kestra.plugin.scripts.r.Commands type:
id: r_commandsnamespace: company.teamtasks: - id: run_r type: io.kestra.plugin.scripts.r.Commands namespaceFiles: enabled: true commands: - Rscript main.RThe contents of the main.R file can be:
print("Hello World")You’ll need to add your R code using the Editor or sync it using Git so Kestra can see it. You’ll also need to set the enabled flag for the namespaceFiles property to true so Kestra can access the file.
You can also have the R code written inline.
id: r_commandsnamespace: company.teamtasks:  - id: http_download    type: io.kestra.plugin.core.http.Download    uri: https://huggingface.co/datasets/kestra/datasets/raw/main/csv/orders.csv
  - id: run_r    type: io.kestra.plugin.scripts.r.Commands    inputFiles:      orders.csv: "{{ read(outputs.http_download.uri) }}"      main.R: |        print("The current execution is {{ execution.id }}")
        # Read the file        data <- read.csv("orders.csv", header=TRUE)        print(data)    commands:      - Rscript main.R
You can read more about the Commands type in the Plugin documentation.
Handling Outputs
If you want to get a variable or file from your R script, you can use an output.
Variable Output
You can get the JSON outputs from the R commands / script using the ::{}:: pattern. Here is an example:
id: r_outputsnamespace: company.teamdescription: This flow runs the R script, and outputs the variable.
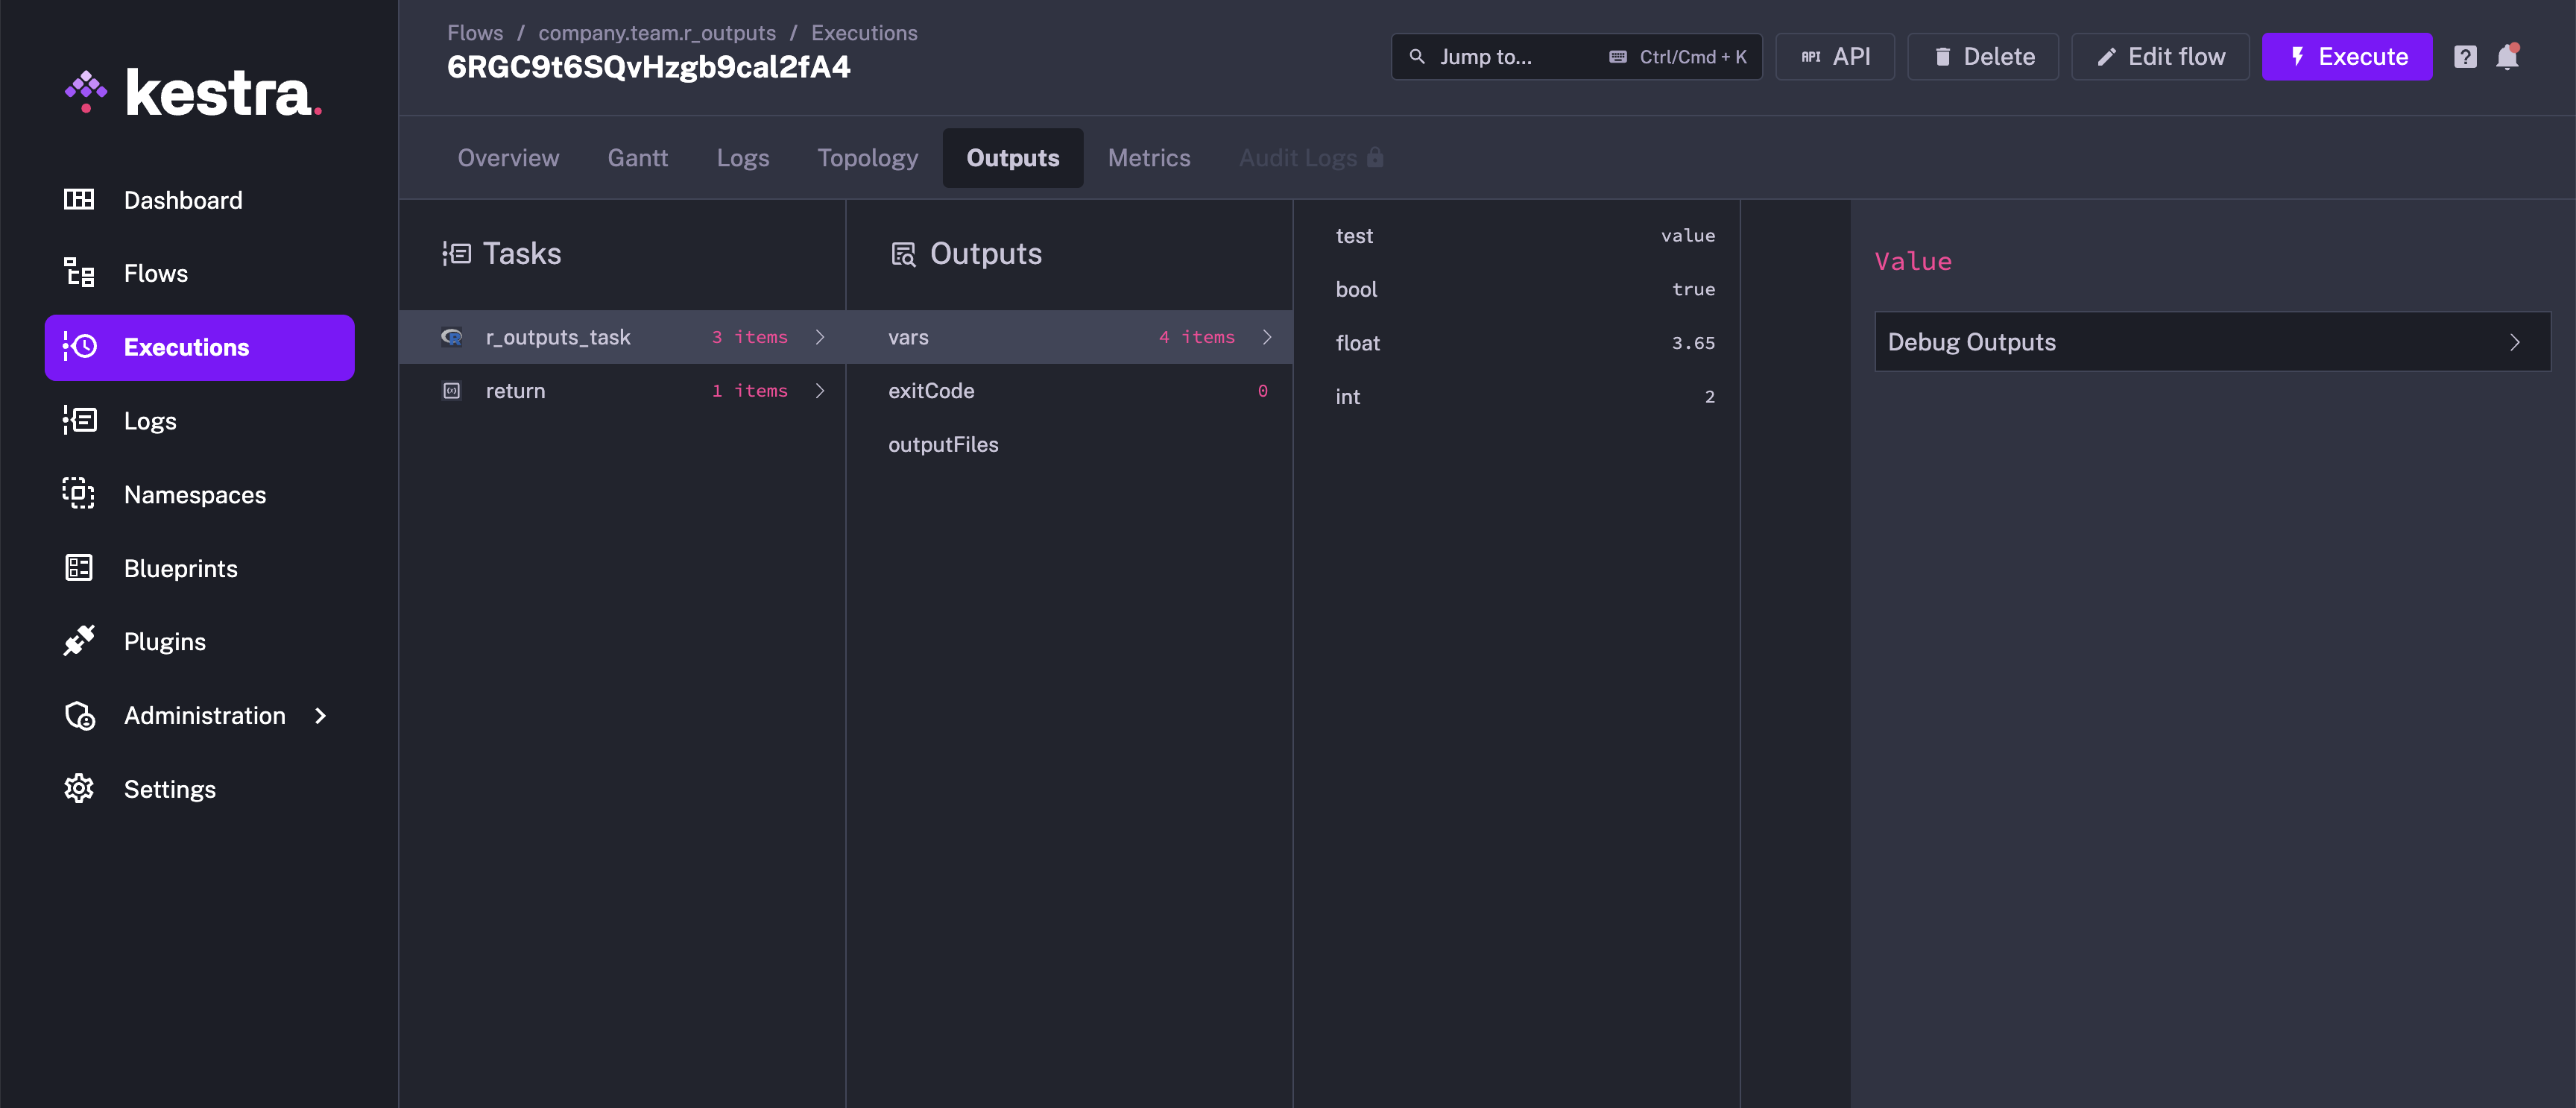
tasks:  - id: r_outputs_task    type: io.kestra.plugin.scripts.r.Script    script: |      cat('::{"outputs":{"test":"value","int":2,"bool":true,"float":3.65}}::')
All the output variables can be viewed in the Outputs tab of the execution.

You can refer to the outputs in another task as shown in the example below:
id: r_outputsnamespace: company.teamdescription: This flow runs the R script, and outputs the variable.
tasks:  - id: r_outputs_task    type: io.kestra.plugin.scripts.r.Script    script: |      cat('::{"outputs":{"test":"value","int":2,"bool":true,"float":3.65}}::')
  - id: return    type: io.kestra.plugin.core.debug.Return    format: '{{ outputs.r_outputs_task.vars.test }}'
This example works for both io.kestra.plugin.scripts.r.Script and io.kestra.plugin.scripts.r.Commands.
File Output
Inside of your R script, write a file to the system. You’ll need to add the outputFiles property to your flow and list the files you’re trying to put out. In this case, we want to output output.txt. More information on the formats you can use for this property can be found in Script Output Metrics.
The example below writes a output.txt file containing the “Hello World” text. We can then refer the file using the syntax {{ outputs.{task_id}.outputFiles['<filename>'] }}, and read the contents of the file using the read() function.
id: r_output_filenamespace: company.teamdescription: This flow runs the R script to output a file.
tasks:  - id: r_outputs_task    type: io.kestra.plugin.scripts.r.Script    outputFiles:      - output.txt    script: |      writeLines("Hello World", "output.txt")
  - id: log_output    type: io.kestra.plugin.core.log.Log    message: "{{ read(outputs.r_outputs_task.outputFiles['output.txt']) }}"
This example works for both io.kestra.plugin.scripts.r.Script and io.kestra.plugin.scripts.r.Commands.
Handling Metrics
You can also get metrics from your R script. We use the same pattern for defining metrics as we had used for outputs ::{}::. In this example, we will demonstrate both the counter and timer metrics.
id: r_metricsnamespace: company.teamdescription: This flow runs the R script, and puts out the metrics.
tasks:  - id: r_metrics_task    type: io.kestra.plugin.scripts.r.Script    script: |      print('There are 20 products in the cart')      cat('::{"outputs":{"productCount":20}}::\n')      cat('::{"metrics":[{"name":"productCount","type":"counter","value":20}]}::\n')      cat('::{"metrics":[{"name":"purchaseTime","type":"timer","value":32.44}]}::\n')
Once this has executed, both the metrics can be viewed under Metrics.
